
Showing posts with label craft tutorials. Show all posts
Showing posts with label craft tutorials. Show all posts
Tuesday, April 19, 2011

Sunday, April 3, 2011
Giveaway / Swap Tutorials
Don't forget about the link party!
I recently took part in a swap called "From Me to You" with Dee over at Ice House Crafts. I actually have a couple tutorials on what I made for her:
Bunny tin sign
Braided jeans wreath
As giveaway winners, Trish from Me 2 U Primitives and Lori from Make Prim Happen received some of my Woodless burlap frames and/or
Paper mache eggs.
I recently took part in a swap called "From Me to You" with Dee over at Ice House Crafts. I actually have a couple tutorials on what I made for her:
Bunny tin sign
Braided jeans wreath
As giveaway winners, Trish from Me 2 U Primitives and Lori from Make Prim Happen received some of my Woodless burlap frames and/or
Paper mache eggs.
Friday, March 11, 2011
Freaky Friday
Well, today started out dripping wet. We were above freezing and it was raining a bit. Then it started to turn to sleet, and now we're in a full blown blizzard. My shoveled out sidewalk is no more, as probably four to five feet of snow has drifted across it.
But at least this side of the earth isn't having the weather/earth problems as Japan is. This is a very sad day, and my heart goes out to them and wow...all those continuing aftershocks that are quite large in an of themselves.
On a brighter note, I did get a wonderful goodie in the mail. I won one of Rusty Thimble's wonderful giveaways.

Oh my gosh, they're so much cuter in person. The camera doesn't do Brenda's talent justice!
In other news, I'll be starting up a regular monthly contest over at the Sunburnt Cow for new online artisans. Please check out the post, and if you'd like to be a judge, please email me. Also, if you want to be one of the contestants, stay tuned to the Sunburnt Cow blog.
Additionally on the Sunburnt Cow, I'll be starting up link parties, which will occur every Wednesday. In this link party, you'll be able to link up blog posts mentioning items you have for sale. This is unlike most link parties in which you can't hook up anything for sale.
Over on my All Thumbs Crafts blog, I posted a tutorial on how to make burlap frames without the use of wood. As many of you might notice, these "frames" are also in my giveaway.
But at least this side of the earth isn't having the weather/earth problems as Japan is. This is a very sad day, and my heart goes out to them and wow...all those continuing aftershocks that are quite large in an of themselves.
On a brighter note, I did get a wonderful goodie in the mail. I won one of Rusty Thimble's wonderful giveaways.

Oh my gosh, they're so much cuter in person. The camera doesn't do Brenda's talent justice!
In other news, I'll be starting up a regular monthly contest over at the Sunburnt Cow for new online artisans. Please check out the post, and if you'd like to be a judge, please email me. Also, if you want to be one of the contestants, stay tuned to the Sunburnt Cow blog.
Additionally on the Sunburnt Cow, I'll be starting up link parties, which will occur every Wednesday. In this link party, you'll be able to link up blog posts mentioning items you have for sale. This is unlike most link parties in which you can't hook up anything for sale.
Over on my All Thumbs Crafts blog, I posted a tutorial on how to make burlap frames without the use of wood. As many of you might notice, these "frames" are also in my giveaway.
Sunday, February 13, 2011
Funky Fabric Wreath Tutorial
I started up a new blog to feature some easy craft tutorials. I like to think of the new blog as a place for the un-Martha: where those of us who are all thumbs and don't have a big budget can still create some nice craft projects.
My first is a Funky Fabric Wreath Tutorial.

My first is a Funky Fabric Wreath Tutorial.

Monday, February 7, 2011
I Feel so Over the Moooooonnnn!
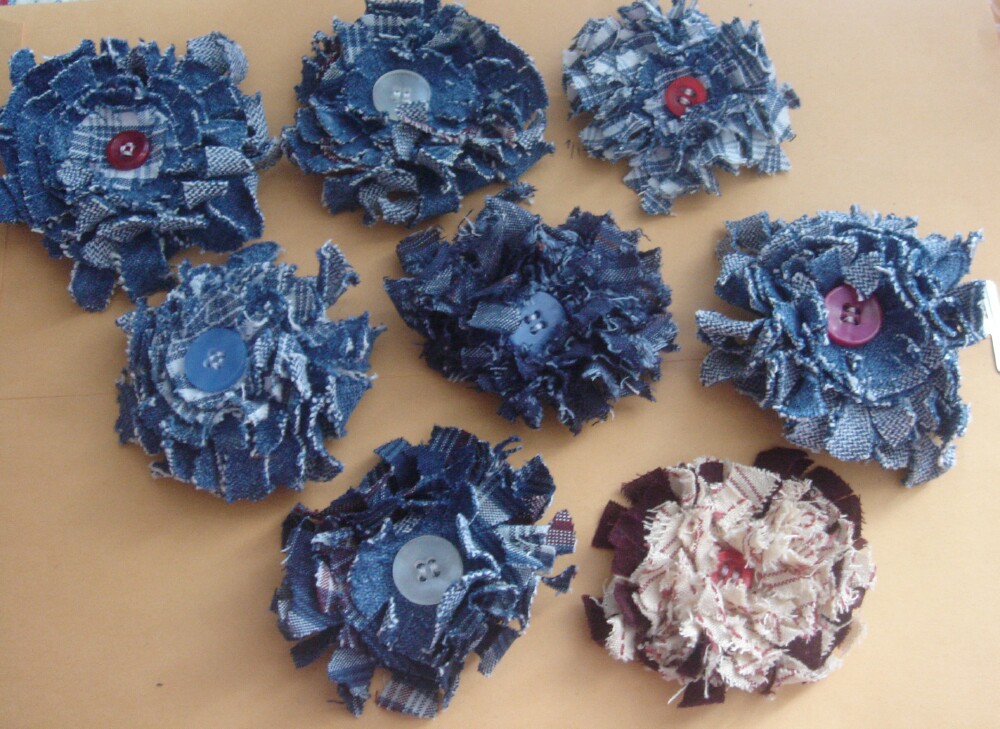
My ragged fabric flowers were featured over at Whipperberry! How cool is that. I think I'm getting the hang of being creative after all!
I'll be working on other tutorials soon. I had so much fun doing the first one, and you all have given me such sweet and encouraging feedback. THANKS!!!!
I'll be working on other tutorials soon. I had so much fun doing the first one, and you all have given me such sweet and encouraging feedback. THANKS!!!!
Saturday, February 5, 2011
How to Make Fabric Flowers
Based on a Handmade Paper Flower Tutorial, I decided to make some fabric flowers.

The first thing you need to do is cut up some circles. The size of the largest circle depends upon how big you want your flower. Since I'm "ragging" these like I do with rag quilts, I cut a little larger than what I want. Then I cut slightly smaller and smaller circles. They don't have to be perfectly circular. In fact, I couldn't cut a perfectly circular round thingie, even if I had a big black line to cut around!

Plus, when you "rag quilt" something, your imperfections are covered up. Neat, huh! For extra interest, I added a couple different fabrics and/or turned the jeans fabric upside down.
Next, cut slits into each circle. These I made about 1/2 to 1 inch in and about 1/4 inch apart. That's the measurement for the largest circle. You'll have to adjust according to size, especially on the smaller circles. You don't want to clip too closely together because, since these are circles, the cuts are going to be closer together towards the center. If they get too close together, they'll just rip right off.

Then stack 'em up, going from the largest size on the bottom to the smallest on the top.

Since you're going to throw these in the washer and dryer to rag like you would rag quilts, you can't use glue to hold them together. I decided to sew a button in the middle instead. You do have to watch, though, if you work with thicker fabrics like denim. If you're going through 6 or more thicknesses...oh boy! Watch your fingers, cuz that's gonna be a toughie fighting to get that needle through all the fabric.

The final step is putting them in the washer and dryer once or twice. I would put them in one of those protective lingerie bags since they're a bit on the delicate side.
And voila!


For the above, I actually couldn't put these in the washer and dryer since my friends returned from their travels, so I no longer had access to a washer and dryer. I just wet these, hung them up by my heater vent, and they still turned out pretty good!
This tutorial has been shared with Today's Creative Blog, A Little Knick Knack, as well as the following link parties:


The first thing you need to do is cut up some circles. The size of the largest circle depends upon how big you want your flower. Since I'm "ragging" these like I do with rag quilts, I cut a little larger than what I want. Then I cut slightly smaller and smaller circles. They don't have to be perfectly circular. In fact, I couldn't cut a perfectly circular round thingie, even if I had a big black line to cut around!

Plus, when you "rag quilt" something, your imperfections are covered up. Neat, huh! For extra interest, I added a couple different fabrics and/or turned the jeans fabric upside down.
Next, cut slits into each circle. These I made about 1/2 to 1 inch in and about 1/4 inch apart. That's the measurement for the largest circle. You'll have to adjust according to size, especially on the smaller circles. You don't want to clip too closely together because, since these are circles, the cuts are going to be closer together towards the center. If they get too close together, they'll just rip right off.

Then stack 'em up, going from the largest size on the bottom to the smallest on the top.

Since you're going to throw these in the washer and dryer to rag like you would rag quilts, you can't use glue to hold them together. I decided to sew a button in the middle instead. You do have to watch, though, if you work with thicker fabrics like denim. If you're going through 6 or more thicknesses...oh boy! Watch your fingers, cuz that's gonna be a toughie fighting to get that needle through all the fabric.

The final step is putting them in the washer and dryer once or twice. I would put them in one of those protective lingerie bags since they're a bit on the delicate side.
And voila!


For the above, I actually couldn't put these in the washer and dryer since my friends returned from their travels, so I no longer had access to a washer and dryer. I just wet these, hung them up by my heater vent, and they still turned out pretty good!
This tutorial has been shared with Today's Creative Blog, A Little Knick Knack, as well as the following link parties:
Subscribe to:
Posts (Atom)


 Posts
Posts


