The first thing you need to do is cut up some circles. The size of the largest circle depends upon how big you want your flower. Since I'm "ragging" these like I do with rag quilts, I cut a little larger than what I want. Then I cut slightly smaller and smaller circles. They don't have to be perfectly circular. In fact, I couldn't cut a perfectly circular round thingie, even if I had a big black line to cut around!

Plus, when you "rag quilt" something, your imperfections are covered up. Neat, huh! For extra interest, I added a couple different fabrics and/or turned the jeans fabric upside down.
Next, cut slits into each circle. These I made about 1/2 to 1 inch in and about 1/4 inch apart. That's the measurement for the largest circle. You'll have to adjust according to size, especially on the smaller circles. You don't want to clip too closely together because, since these are circles, the cuts are going to be closer together towards the center. If they get too close together, they'll just rip right off.

Then stack 'em up, going from the largest size on the bottom to the smallest on the top.

Since you're going to throw these in the washer and dryer to rag like you would rag quilts, you can't use glue to hold them together. I decided to sew a button in the middle instead. You do have to watch, though, if you work with thicker fabrics like denim. If you're going through 6 or more thicknesses...oh boy! Watch your fingers, cuz that's gonna be a toughie fighting to get that needle through all the fabric.

The final step is putting them in the washer and dryer once or twice. I would put them in one of those protective lingerie bags since they're a bit on the delicate side.
And voila!


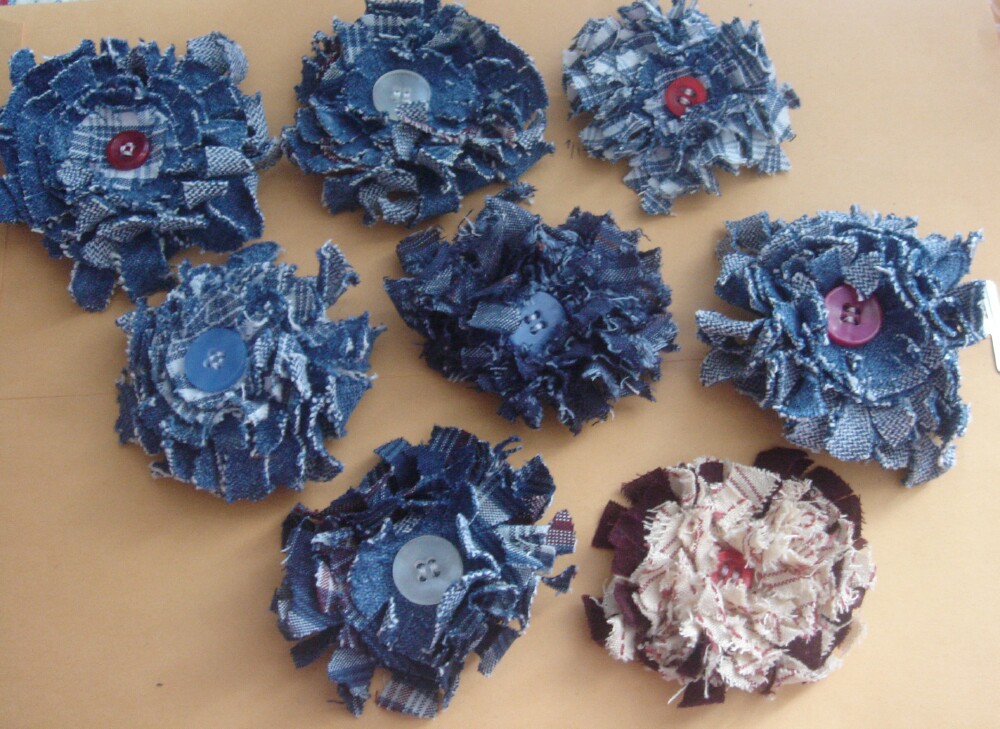
For the above, I actually couldn't put these in the washer and dryer since my friends returned from their travels, so I no longer had access to a washer and dryer. I just wet these, hung them up by my heater vent, and they still turned out pretty good!
This tutorial has been shared with Today's Creative Blog, A Little Knick Knack, as well as the following link parties:


Tracy, those are adorable! Thanks so much for the tutorial (you are too funny, by the way, "couldn't cut a round circle thingie" :O); I'm envisioning pillows adorned with ragged flowers for Spring! They turned out great toasting on your heater vent! Deb
ReplyDeleteLOL! And did you notice how un-circular my so called circles were when I had them all stacked up, one on top of the other! HAHAHA! I think everyone now knows why I like the rag technique so much. :)
ReplyDeleteOh, by the way, Deb, I think your idea of putting them on pillows is a great idea. If you do so, please take pics!
ReplyDeleteThey turned out great! Thank you for sharing such a great tutorial!
ReplyDelete*hugs*
Debbie
Great Idea....Endless possibilities!
ReplyDeleteYes, I agree with the above comments.....great idea and can be used on all sorts of things.
ReplyDeleteNow if I will actually make them! (have tons of ideas to do!)
Thanks Tracy!
Absolutely beautiful!!! I LOVE how you took the idea and ran with it. Thanks for sharing these with me, I am so inspired!
ReplyDeletevery cute....great idea!
ReplyDeleteThank you all so very much for your comments!
ReplyDeleteEmily - your tutorials certainly inspire me. I'll be trying some more soon.
Lori - they're very easy to make. You can even do the cutting and sewing while watching TV - so no excuse not to make them. (grin)
I really like them.. so cute and endless possibilites.. Would look great all over the front of a jean purse..
ReplyDeleteMaggey
Good idea about the jeans purse. As I recall, Maggey, you make purses, don't you?
ReplyDeleteHow did I miss these the "first time around" at Whipperberry?? Glad you were featured today, as I LOVE your rag flowers. Thanks for the tutorial on how you made them -- can't wait to try!
ReplyDeleteTracy, what a wonderful tutorial. I love how these turned out. I'm definitely going to give these a try. Thanks so much. !!
ReplyDeleteI wanted to let you know we featured you on WhipperBerry today! You can check it out here . Come grab a featured button if you would like!
ReplyDeleteThese are great! Thanks for sharing your idea. Just wanted to say that using a rubber balloon (yep, balloon) is a great way to grip those needles when you need to pull them through something thick or difficult - give it a try! Thanks again -
ReplyDeleteThanks, Jules, for the tip. I'm definitely going to have to try that. It's so hard to grip that needle cuz it gets slippery and hard to grasp, and using a rubber balloon would make it a whole lot easier.
ReplyDeleteWhat a great idea! I'm going to bookmark this and perhaps one of my teddies will sport a little handmade flower! Hugs, Vicki
ReplyDeleteOh, that would be a cute idea, Vicki! I'm looking forward to seeing what you come up with since you make such awesome bears. :)
ReplyDeleteThis would be a fun project to do with a good movie! I love how the dryer rags them up like that. I can see some of these attached to some sticks to make a fun spring bouquet. :)
ReplyDeleteThanks so much for linking up to Terrific Under Ten Tuesdays!
Kindra - I like that idea. A spring bouquet that won't wilt. :)
ReplyDeleteHi there! Just wanted to let you know that I used this tutorial to make some fabrics flowers for a new changeable wreath I did. You can see it here:
ReplyDeletehttp://thecellardoorstories.blogspot.com/2011/02/changeable-wreath.html
thanks for the inspiration!
I lOVE these! They look really simple and super fun! I can't wait to make them!!!
ReplyDeleteYou're welcome, Angie.
ReplyDeleteCravingcolor - if you make any, please send me the url to your post if you post about them. I'd love to see them!
I've never heard of the rag quilt technique, but I do love it! They turned out great, and thanks for linking up, it was a fabulous tutorial!
ReplyDeleteThanks! And thanks for having your fun link party. :)
ReplyDeleteGreat texture on these!
ReplyDeleteWhat a great idea!
ReplyDeleteThanks for linking up on http://patchesofpink.com.
Thanks, ladies. And thanks, Jalisa, for hosing a link party!
ReplyDeleteI tried this, but your directions are better. I will try again. thanks.
ReplyDeleteReally cool flowers. I can see them adorning my daughters hair on a hairtie or a clip. Really nice.
ReplyDeleteThank you for sharing.
I'm loving the raggedy look of the flowers! I'll definitely be making these. Please link up to my party this weekend and show off this project!
ReplyDeleteLove these! I would love for you to link up to my Ten Buck Tuesday link parties!
ReplyDeleteThanks so much for the comments, ladies! I hope you have fun making these. :)
ReplyDeleteSo cute & fun!
ReplyDeleteThanks so much for linking to "20 Below Thursday"! :)
Thanks for having a link party, Christina. :)
ReplyDeleteWhat interesting flowers! Such a great idea. They'd be really cute to dress up a handbag!
ReplyDeleteThese are very cute and look like fun to make! :)
Tnx so much for linking this up at my party this weekend! :D
Great tutorial and what beautiful flowers! :)
ReplyDeleteLove your creativity, thanks for linking up to my blog bash K.I.S.S. @ The Tattered Tag. Please link up more of your great ideas tomorrow. :)
ReplyDeleteDrop by The Tattered Tag
Wow, thanks so much, Barb! You've made my day...and boy, did I ever need a pick me up.
ReplyDeleteCheers,
Tracy
These are so cute! I would never have thought of sticking them in the wash to get that effect!
ReplyDeleteThanks so much for linking this up!
Thanks, Rissa, and thanks for having a link party. :)
ReplyDeleteThese are so cute! I'm gonna try making them this week. With a little one, I don't have as much time to craft but I love how this doesn't take long :).
ReplyDeleteSophie -
ReplyDeleteThis would indeed be a good craft to do around little ones since most of the developing of the flowers is done in the washer and dryer. :)
If you post a picture anywhere of the flowers you made, please leave a comment with the url. I'd love to see them.